Hello Engineers. There is a lot of solar automatic lighting stuff available over the internet as well as on this site too. Projects like automatic solar night lights, solar automatic night lamp rechargeable Led lights, Automatic solar street light, multipurpose solar camping tool, etc. Today, I am going to add up a little more to that list. In this tutorial, I will give you 3 solar automatic night lamp lighting projects which are very easy to do and much easier to understand. All three of the circuits are very small 5minutes stuff yet very useful and effective. So, let’s start with today’s topic ” 3 solar automatic night lamp / garden/ lawn light projects”. Or ” Solar automatic night lamp | streetlight circuit | porch light circuit.
So, let’s discuss about first one.
Solar automatic night lamp / Porchlight/lawn light circuit 1
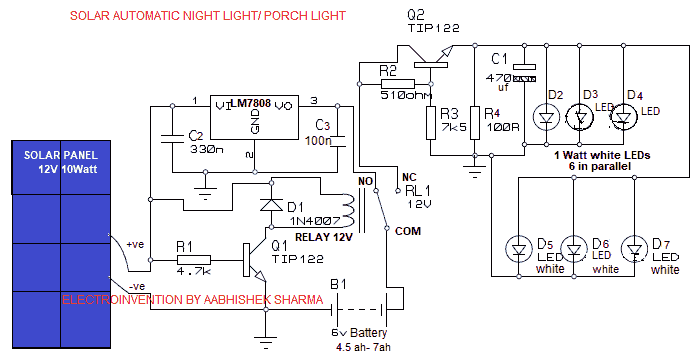
The one circuit which is below is an effective circuit for automatic night lamp for garden/lawn or porch light. It is having proper regulation and protection with a max capacity of about 15w( also depending upon battery capacity) max.
Circuit Diagram

Material
- Solar Panel 12v 10watts to 15w
- 6v battery- SMF / Lead-Acid 4.5 ah – 12ah
- Relay 12v
- R1 4.7k
- Q1 TIP122
- LM7808 voltage regulator
- D1 1N4007
- C1 470uf
- C2 330n
- C3 100n
- Q2 TIP122
- R2 510Ohms
- R3 7K5 ( 7.5K Ohms)
- R4 100R
- D2-D7 1watt LED lights ( 6 pcs)
- PCB 2 pcs
Full Working
The circuit above is well regulated and with properly controlled regulation for battery charging as well as for load automatically with respect to the day & night. The circuit is having 12v 10 watts solar panel for battery charging and day time detection. Once the solar panels detect sunlight output from solar panel turns on the transistor Q1 which is TIP122 with the collector connected to a 12v relay. After the transistor turns on, it connects the relay side connected to the collector with the ground by opening the junction. Due to the other side of the relay connected to the 12v +ve, the relay is ON and COM gets connected to NO( normally open) pin which makes battery charging possible. The battery charging is done by the LM7808 voltage regulator’s output.
Even if we have a 6v 4.5ah battery it will take approx. 4 hours and this is the time during which the good quality sunlight is available in most of the places. The Min. and Max. type can range from 4.5ah – 12ah. Once the solar panel is unable to make enough supply to trigger the relay, the COM pin is shifted back to NC pin(Normally Connected). This then lets the TIP122 to get supply and regulate it to 4.7V to power the 1 watt LEDs.
The backup time is again dependent on the total available backup power divided by power requirement by load per hour.
i.e Total backup power(in watts) / Total power required by load per hour(in watts).
For e.g, We have 6 v 4.5 ah battery which is equivalent to total power i.e 27 watts approx. and We have 6*1 watt LEDs in parallel which means 6 watts/hour. So, the total backup time available is 27/6= 4.5 hours theoretically. But practical situations are a bit different as there will be regulation circuit also in between. So, due to resistance, heat dissipation, power loss, voltage drop, etc factors, the actual time will be around 4 hours (acc. to 6w load). With a 7ah battery, this can be increased more.
One more important thing is aspect is that it starts becoming dark since evening at 6:30 or 7 pm. So, even if the backup is 7 hours then too, it can only serve from 7 pm evening to 2 am night approx (acc.to 6w load). I suggest to use a bigger battery for more backup, let’s say 6v 12ah that can give 12 hours backup (acc. to 6w load).
So, this was all about the circuit above.
Now let’s move on towards the next very much simpler circuit.
Mini Solar automatic porchlight/ mini night lamp Circuit 2
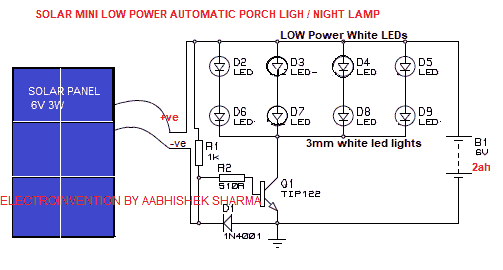
This circuit is very much simpler than one discussed above but also low power and low regulation and accuracy. Still, it’s good where there is a need for less bright light. This circuit is capable of Powering low power 3mm LEDs. So, let’s begin with the circuit.

Matterials
- Solar panel 6v 3 watts
- R1 1K
- R2 510 R
- Q1NTIP122
- D1 1N4001
- D2-D9 low power 3mm white LED (normal one)
- Battery 6v 2- 4ah
The circuit above is too much simpler than the first one. The circuit is is having 6v 3 watts solar pane l for sunlight detection as well as to keep the battery topped up @ 6v. Since this circuit isn’t using any relays or voltage regulators, etc, so, its working is a bit different than others. Here, during the day time, when the solar panel is working the solar panel generates an output of about 6.4 v- 7.3 v mostly.
Since the current chooses its shortest and easiest path to travel so the 1K resistor creates a barrier to the panel output. The same is with LEDs as they are not getting the ground so they also not allow current to pass through. So, simple all the solar panel output goes to the 6v battery. The battery gets charged even when the voltage is 6.4v as this also keeps the battery topped up to 6v. In most of the time output by the solar panel is a bit more than the rated.
During the dusk, the solar panel isn’t generating any output.
This time the battery’s output, from the R1 and through the R2 passes and turns on the TIP 122 power transistor. TIP 122 then connects the LED’s cathode to the GND or battery negative. On the other hand, the battery positive is connected to the LED positive, this then makes all the LEDs to glow. Here, this circuit only supporting the low power loads so this kind of circuit is suitable for conditions requirements of less brightness. The backup time, in this case, is good and better due to the very low power consumption by the load. This was all about this circuit.
Let’s move on to our next very useful circuit.
Solar Automatic Backyard Door porch light/ night light Circuit 3
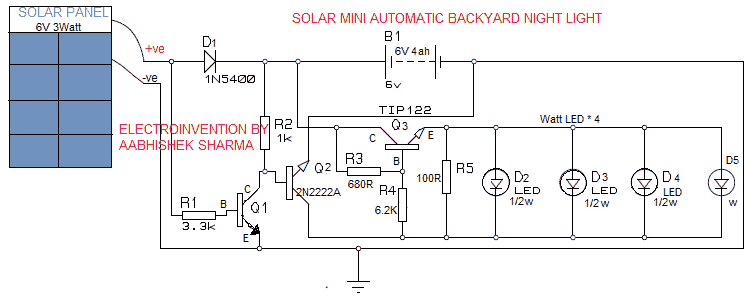
The Circuit that’s shown below is designed for low power consumption load only up to 3 watts max. This circuit is useful where there we do not need high brightness light. Like the backyard door, porch light needs to be too bright unless it’s not a very big area. But to keep on the whole night, it’s a fine light.

Materials
- Solar panel 6v 3watts
- R1 3.3k
- R2 1K
- R3 680R
- R4 6K2 or 6.2K
- R5 100R
- Q1 TIP122
- Q2 2N222A
- Q3 TIP122
- D1 1N5400
- 6V 2ah- 4ah battery
- D2-D5 white LED 1/2 watts
The circuit shown above is a low power circuit with a maximum power withstand of about 5 watts max. There are 6 volts 3 watts solar panel to charge the battery as well as to detect daylight. During the day time, the solar panel does two tasks, on one side it charges the battery and on another side, it activates Q1. After the Q1 is activated via getting its base supply, it opens the junction and now its collector which is connected to the base of Q2 gets grounded. So this keeps Q2 shut down and as a result, the Q3 is also not getting its circuit completed and LEDs remain off.
During the absence of output by the solar panel, Q2’s base gets supply via R2 and now TIP122 is also getting grounded by the collector of Q2. Now TIP122 can now regulate and give supply to the LEDs. I have set the output from the TIP122 emitter follower regulator circuit up to 4.7v. This value can be set by R4.
The backup of this circuit is very good as I have mentioned 4*0.5 Watts LEDs in parallel. So, 2 watts load and we have a good power backup 12 hours approx.
So, this was all about this circuit. Here I have explained three circuits in this article designed by me. I prefer the 1st circuit the most for a good performance and proper regulation. Although 3rd circuit is also good.
So, guys, I hope you liked this tutorial. If you have any kinds of questions about any of these circuits, you can ask me in comments.
Also, do subscribe to our newsletter for latest post updates. Thank you.


Another question
In the first circuit, in the morning, the solar panels are supposed to charge the battery, and at night the battery lights up the lights
So if the battery is already charged and not discharged, what happens in the morning?
Why would battery be already charged and not discharged?
At night automatically light will turn ON.
So ofcourse light will draw power.
Thanks sir, the circuit battery has really started turn on the lights
Hello Marwa, Thanks for giving a review, good to know it helped.
Can you make the first circuit diagram on the breadboard because I can’t know to do it?
Sure once I get time. By the way you can try other circuits too, which the visitors have already tried.
cool easy handy circuits
Hello Olawale here again. I am very very thanks to you, it working well. i was having a 7 ah battery only and I use 10 watt Led panel total 10 of 1watt leds and it giving me approx 3.5 hours backup time, else everything is working really good. Please tell how to get more bckup time plz. Thank you
Hello Olawale Bejune, Welcome again. I am glad that you tried the first circuit and it worked well as per your expectations.
Answer to your question:
1. As I have already answered in previous comments about the backup, let me clear you again that with 6v 7ah battery you have 42w total backup power and if you have load for 10w led panel, then it can go approx 4 hours and practically as you said 3.5 hours approx depending upon battery charged also.
To get 5 hours backup, you have options:- 1st. Use more ah value battery let’s say 10 ah or two 7ah in parallel.
2nd. Reduce the load power requirement, which means instead of 10* 1watts LEDs in parallel, reduce them to 6 or 7. That can give you a good backup time either equal to or more than 5hour backup time.
Thank you once again for trying it ad updating the results here. Keep in touch. ?
Double the battery. If that is not enough, you can get 3 or 4 batteries connected parallel.
Yes, that is right, but we have to keep everything optimized and also in-tune with each other. like design, capacity, load, size, cost, and setup.
Hey I am first time on this site, I realy liked all of 3 circuits but I liked the first one most.
Can I know is it safe to use 10 leds of 1 w in pparallel instead of only 6 in 1st circuit?
what would be the battery specs if I want 6-7 hours backup time? Please reply fast…Thank u sir
Hello, Olawale, welcome to my site.
Your answers:
1. Yes, you can use 10*1watts LEDs in parallel, which means 10W LEDs panel just appropriate battery specs are needed to be used.
2. “For 6-7 hours backup”, you asked, I have mentioned in the article about how calculated the backup time and configure things according to that. For 6-7 hours backup, you need to use 6v 10ah battery or use two 6V 7ah batteries in parallel to get more backup. With 6v 10ah and 10w Load, You’ll get 6 hours backup theoretically, which will be 5.5 hours approx. practically.
If you use two 7ah batteries in parallel, then the total is 14ah and with the same load, you’ll get 8 hours backup.
Superb
Thanks for your appreciation. Keep in touch.